How to create Tables in Figma
As a design system designer, I’ve struggled for a while with creating flexible table components in Figma. The main issue? Designers often have to detach component instances simply to modify column widths, undermining the efficiency components are meant to provide.
However, in May 2025, Figma introduced its new “Grid” approach. My initial reaction was one of excitement, as it seemed to promise a much-needed solution for easily creating tables with customizable column sizes.
Let’s jump into it.
What to do first?
I recommend first thinking about how you would like to work with the tables. You should consider these questions, and based on the decision, feel free to change the order or skip some of the steps in this article.
Is there a need to create multiple variants of tables?
Is there a need to match any 3rd party library like AG Grid?
If your answer is yes, I recommend following these steps:
Create components for header and cell
Create layout
Create a table with header and cell instances
Finalize the table
Create components for header, cell, and other parts
If you use a design system or a 3rd party library with all these parts built, you can skip this part.
Header component
You need to create a header component with all parts needed for your design, or you can enhance it later if you find that something is missing. Here are some ideas of what can be part of the header:
Checkbox (for select all feature)
Label
Sorting (A-Z, Z-A, …)
Filter
Menu
Resize handle
My recommendation is to create the component using frames and Auto Layout.
Cell component
You need to create a cell component with all parts needed for your design, or you can enhance it later if you find that something is missing. Here are some ideas of what can be part of the header:
Checkbox
Drag&Drop handler
Tree
Text
My recommendation is to create the component using frames and Auto Layout.
Pagination
This is an optional component. Here are some ideas of what can be part of the header:
Page size with dropdown
Number of items like 1 to 20 of 100
Pagination < Page 1 of 5 >
There might be other parts, so you can basically do the same to create other components needed for your tables.
Create layout
Create a frame in your project, and in the right panel, find a section called “Layout”. There is a “Flow” subcategory, and you need to select the “Grid”. You can see it in the image below.
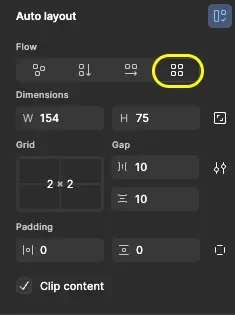
Gap
Gap controls the spaces between rows and columns. So feel free to change them to 0 to make it look more like a table.
Dimensions (Width and Height)
Dimensions allow you to adjust the size of the whole table. You can change the width and height of the whole table, and right now, the settings of the grid automatically change the proportions inside.
Now you have prepared the layout, and you can add your table components.
Create a table with header and cell instances
Now, you can simply add your header and cell instances to the layout. The key is to set them to “Fill x Fill”. You can achieve this by resizing the instance to fill the number of columns you need.
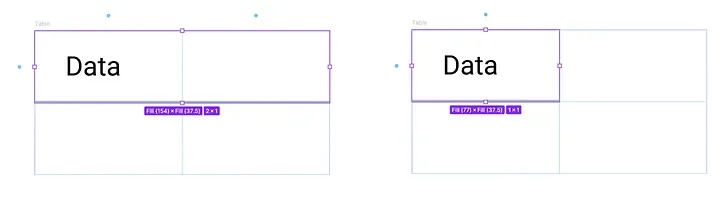
You can now fill in your data and repeat these steps to complete your entire table.
Finalize the table
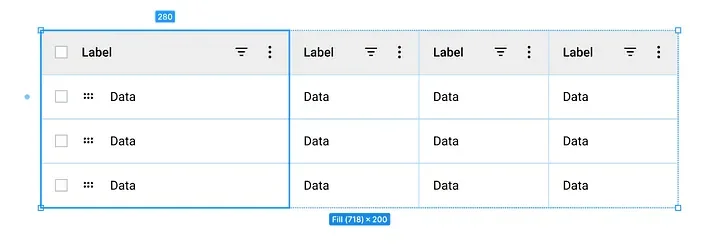
We’re almost done setting up your table! It should now look similar to the table in the image below, with a one-pixel stroke added to its frame.
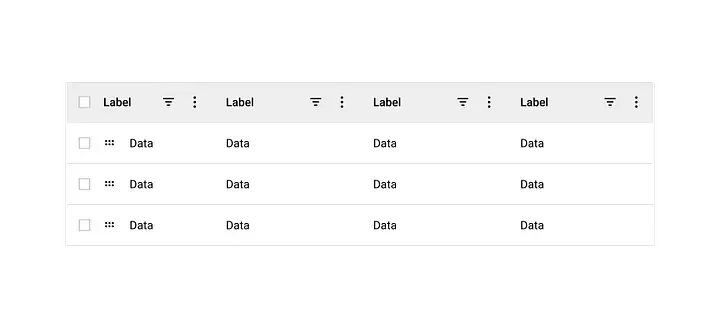
Now, when you hover over a column or row, you’ll see blue points appear next to it. These points allow you to set the size of the column or row.
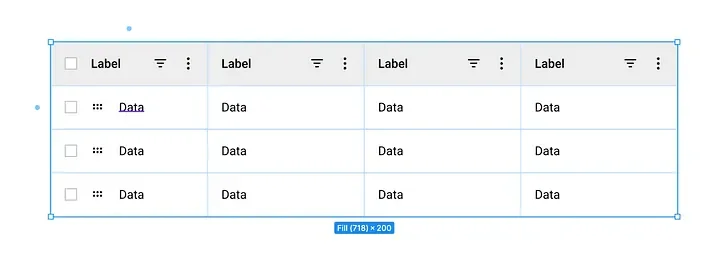
When you select a column or row, you can easily resize it by dragging the blue container or by entering a specific value in the blue field.
What to do next?
Now your table is ready, and you can simply copy and paste it whenever you need to have this table. I hope this article helped you with creating the tables in Figma. See you in the next topic.
